Part I - Creating an Azure build pipeline for pull requests
This article is part of a series for setting up the single pipeline}
One of the things I particularly like about this method of defining your pipelines is that it is entirely controlled by a file in your project. That has the advantage of making dealing with your pipelines feel the same as dealing with your code, and maybe it’s just me, but I like that. And, yes, you can also use the file as the starting point of another pipeline.
With that said, let’s get started by creating a YAML file in the root folder of your solution. I add it to the VS solution itself, where it will appear in the Solution Items folder.
Putting together the build file #
1. Set up the pipeline #
First, let’s set up the pipeline:
pool:
  vmImage: 'windows-2022'

continueOnError: false

variables:
  solution: '$(Build.SourcesDirectory)/<solution file name>.sln'
  buildPlatform: 'Any CPU'
  buildConfiguration: 'Release'
This tells the pipeline to run on a Windows Virtual Machine, and sets up some variables that the build will use.
2. NuGet #
We now install the NuGet package manager, and get it to install all the packages our solution uses.
    - task: NuGetToolInstaller@1
      displayName: Install Nuget

    - task: NuGetCommand@2
      displayName: Install Packages
      inputs:
        restoreSolution: '$(solution)'
3. Build the solution #
Now we just run the bog-standard MS Build task to build our solution.
    - task: VSBuild@1
      displayName: Build Solution
      inputs:
        solution: '$(solution)'
        msbuildArgs: '/p:DeployOnBuild=true /p:WebPublishMethod=Package /p:PackageAsSingleFile=true'
        platform: '$(buildPlatform)'
        configuration: '$(buildConfiguration)'
4 Run the unit tests #
With the solution successfully building, we then run the unit tests:
    - task: DotNetCoreCLI@2
      displayName: Run Tests
      inputs:
        command: 'test'
        projects: '**/*.Tests/*.csproj'
5 Create the database migration SQL script #
And then we create the SQL script for the database migration:
    - task: PowerShell@2
      displayName: Create EF Migration Script
      inputs:
        targetType: 'inline'
        script: |
          dotnet tool install --global dotnet-ef
          dotnet ef migrations script --idempotent --project $(Build.SourcesDirectory)\<Data Layer folder>\<Data Layer project>.csproj --output $(Build.ArtifactStagingDirectory)/migration.sql
Together, this will build the solution, run the tests, and create the SQL script for the Entity Framework migration. If any of these fail, then the build will fail.
Create and run the pipeline #
Get this file merged into your main branch, then go to Pipeline_s in Azure DevOps and create a new one. When you get to the screen to configure your pipeline, you want to select _Existing Azure Pipelines YAML file, and the select the file you just merged into main.
This should automatically queue up the pipeline to run, and if you click into the details page, you should hopefully see something like this:
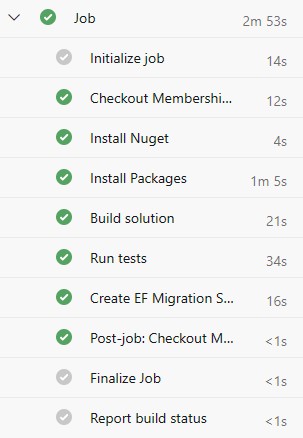
Success!
Automatically run the build for a PR #
With the build file successfully running, we now want to run it every time a PR is created, and to also require a successful build before that PR can be completed.
Go to Branches in Azure DevOps -> click on the 3 dots that will appear when you hover over the end of the table row for the main branch. Select Branch policies and add a new Build Validation policy. Select the build you want to run for each PR, and make the Policy requirement required.
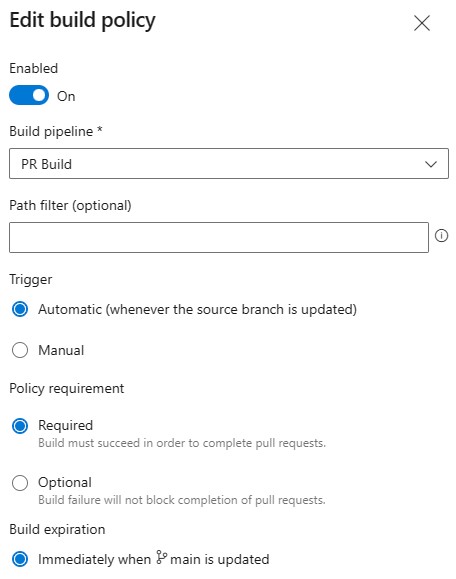
This pipeline will now run every time you create or update a pull request, and a failed build will stop the PR from being merged.
Summary #
Hopefully you’ve got to this point and managed to successfully create a pipeline to build your project every time you submit a pull request.
In Part II, we will start the process of creating a multi-stage pipeline to build and deploy our solution to a Linux Web App.