Part III - Creating a CI/CD pipeline with EF migrations in Azure
This article is part of a series for setting up the single pipeline}
Having created the build stage of our multi-stage pipeline, it’s time to add the next stage, deploying to the Test environment. Again, we first set the stage up:
- stage: QA
  dependsOn: Build
  jobs:
  - job: DeployQA
    displayName: Deploy To QA
    pool:
    vmImage: 'windows-2022'
Then we download the output of the build stage:
    steps:
    - checkout: none
    - download: current
      artifact: drop
This says to not checkout the solution from Git, as we’ve already built the solution in the previous stage, and download the artifact named ‘drop’ from the current pipeline.
Firstly, we want to run the Entity Framework migration on our database:
    - task: SqlAzureDacpacDeployment@1
      displayName: Run EF Migration
      inputs:
        azureSubscription: '<Service Connection Name>'
        AuthenticationType: 'servicePrincipal'
        ServerName: '<server name>.database.windows.net'
        DatabaseName: '<database name>'
        deployType: 'SqlTask'
        SqlFile: '$(Pipeline.Workspace)\drop\migration.sql'
        IpDetectionMethod: 'AutoDetect'
Pay particular attention to which authentication method we are using here:
AuthenticationType: 'servicePrincipal'
which told the task to login to the database using the service principal the pipeline is running as. This fails, which is fair enough, as the service connection is an Azure Active Directory (AAD) user, and the database doesn’t know about it.
As I’m setting this project up from scratch, I need to create the Service Connection and Service Principal we will use to connect to the database.
Click on the Settings cog in the bottom-left corner, then the service connections link in the Pipelines section, the the New service connection button. You want to select the Azure Resource Manager connection type and the Service principal (automatic) Authentication method, then assign this to the correct Subscription and Resource group, and give it a decent name.
Merge this in, and it will automatically run. You should find that the Build stage successfully runs, but the Deploy stage doesn’t even start. You will hopefully see a message like this:

If you click on the View button next to this message, you will be asked to grant the pipeline permission to use the service connection we just created.
Running this build again will now result in a different failure:
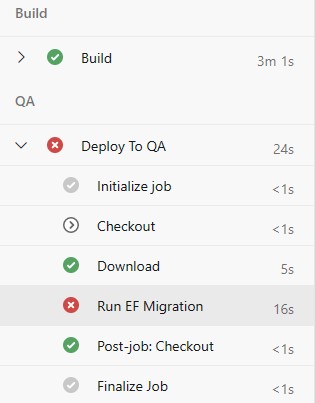
In the next post, we will look at what steps we need to get this running.