Part IV - Configuring a database for EF Migrations on Azure CI/CD
This article is part of a series for setting up the single pipeline}
Allowing the Azure service connection permission to access and alter the database #
So, we’ve attempted to run an Entity Framework database migration as part of deploying to the QA environment, so far unsuccessfully. If you noticed how we set up the migration task, we had:
AuthenticationType: 'servicePrincipal'
which told the task to login to the database using the Service Principal the pipeline is running as. This obviates the need to provide the pipeline with a database connection string, password and all, so is more secure. The task fails to login, which is fair enough, as the service connection is an Azure Active Directory (AAD) user that the database doesn’t know about.
Fortunately, this is actually quite simple to remedy.
Getting the service connection username #
In order to add the pipeline AAD user to the database, we first need its name, and I’d also suggest renaming it too.
In Azure Devops, click the Settings cog in the bottom left corner of pretty much any page in DevOps, click on the Service connections link in the Pipelines section, and click on the Service Connection we created in the previous post. In the details pane, click Manage Service Principal.
To change the name, in the Essentials section of the Overview page, the Display Name is a clickable link that takes you to a page where you can change the name to be less Guid-y. I’ve gone with
Adding the user to the database #
Now, we move over to Sql Server Management Studio (SSMS), though you can also do it using the Azure CLI if that’s more your bag.
Please note: in order to be able to set up Azure Active Directory users in your database, you need to be logged onto the database server as an Active Directory user with Admin privileges. You set AAD users as database admins on the Azure Active Directory section of the Settings section of the database server and not the database itself.
First, setting the database used to master, we create a user for the database from an External Provider:
CREATE USER [<Service Connection Service Principal display name>] FROM EXTERNAL PROVIDER;
Now change the database to the one we want to run the migration on. We now need to create a user in that database too, and then assign that user to the roles required to be able to run database migrations:
CREATE USER [<service connection AAD display name>] FROM EXTERNAL PROVIDER;
ALTER ROLE db_datareader ADD MEMBER [<service connection AAD display name>];
ALTER ROLE db_datawriter ADD MEMBER [<service connection AAD display name>];
ALTER ROLE db_ddladmin ADD MEMBER [<service connection AAD display name>];
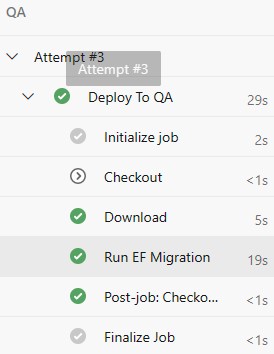
That should be enough. Go back to your pipeline run, and re-run failed jobs.
Hopefully, you’ll get a successful run this time:
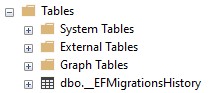
And, just to be sure, check your database, you should now have an __EFMigrationsHistory table (assuming that you weren’t running EF migrations on the database previously):
And with migrations successfully set up, we just need to deploy the web app to the app service:
- task: AzureRmWebAppDeployment@4
  displayName: Deploy Web App To QA
  inputs:
    ConnectionType: 'AzureRM'
    azureSubscription: '<Service Connection Name>'
    appType: 'webAppLinux'
    WebAppName: '<web app name>'
    packageForLinux: '$(Pipeline.Workspace)/drop/$(Build.BuildId).zip'
    RuntimeStack: 'DOTNETCORE|7.0'
    StartupCommand: 'dotnet <api project name>.dll'
Merge this in, and you should end up with a successfully deployed web app!
Next to add a stage to deploy to production.