Part V - Creating a CI/CD pipeline with EF migrations in Azure
This article is part of a series for setting up the single pipeline}
It’s now time to add the next stage, deploying to the Production environment.
Firstly, create a new Service Connection, rename the Service Principal, and get that user set up in your database, in the exactly the same way as we did for the test environment deployment.
Before adding the new stage, however, I want to have to approve the deployment to production, not just automatically deploy once the deployment to QA succeeds, which would be the default behaviour. The way to do this is to create a build Environment in Azure Devops. I’m going to name it Production, for obvious reasons.
Azure Devops will ask if you want to create a resource for the environment, but that isn’t required for what we want to do. Instead, click on the 3 dots in the top-right corner of the Environment page and select Approvals and checks, and select Approvals on the page that loads. Select the user(s) or user groups you want to require approval from and click Create.
With that done, we just need to add a stage to the build script.
Again, we first set the stage up:
- stage: Production
  dependsOn: QA
  jobs:
    - deployment: DeployProduction
      displayName: Deploy To Production
      pool:
        vmImage: 'windows-2022'
      environment: 'Production'
      strategy:
        runOnce:
          deploy:
            steps:
            - checkout: none
            - download: current
              artifact: drop
            - task: SqlAzureDacpacDeployment@1
              displayName: Run EF Migration
              inputs:
                azureSubscription: '<Service Connection Name>'
                AuthenticationType: 'servicePrincipal'
                ServerName: '<server name>.database.windows.net'
                DatabaseName: '<database name>'
                deployType: 'SqlTask'
                SqlFile: '$(Pipeline.Workspace)\drop\migration.sql'
                IpDetectionMethod: 'AutoDetect'
            - task: AzureRmWebAppDeployment@4
              displayName: Deploy Web App To Production
              inputs:
                ConnectionType: 'AzureRM'
                azureSubscription: '<Service Connection Name>'
                appType: 'webAppLinux'
                WebAppName: '<web app name>'
                deployToSlotOrASE: true
                SlotName: '<staging slot name>'
                packageForLinux: '$(Pipeline.Workspace)/drop/$(Build.BuildId).zip'
                RuntimeStack: 'DOTNETCORE|7.0'
                StartupCommand: 'dotnet <startup project name>.dll'
You will again be asked to give the pipeline permission to use the Service Connection we created earlier, as well as the environment. Merge this in, and it will automatically run. You should find that the Build stage successfully runs, but the Deploy stage doesn’t even start. You will hopefully see a message like this:

If you click to approve deployment, this stage will now hopefully successfully run:

Now it’s working, it’s time to see if the build can be sped up, as if we look again at the build log:
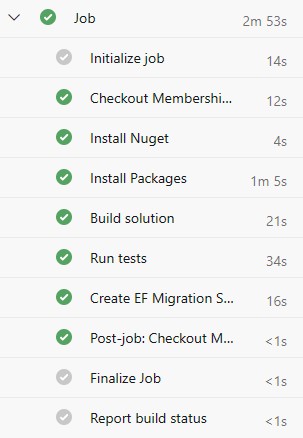
you can see that the longest tasks were installing the NuGet packages and running the tests, which I find annoying!
In the next post, we will look at speeding up the Nuget packages installation task.